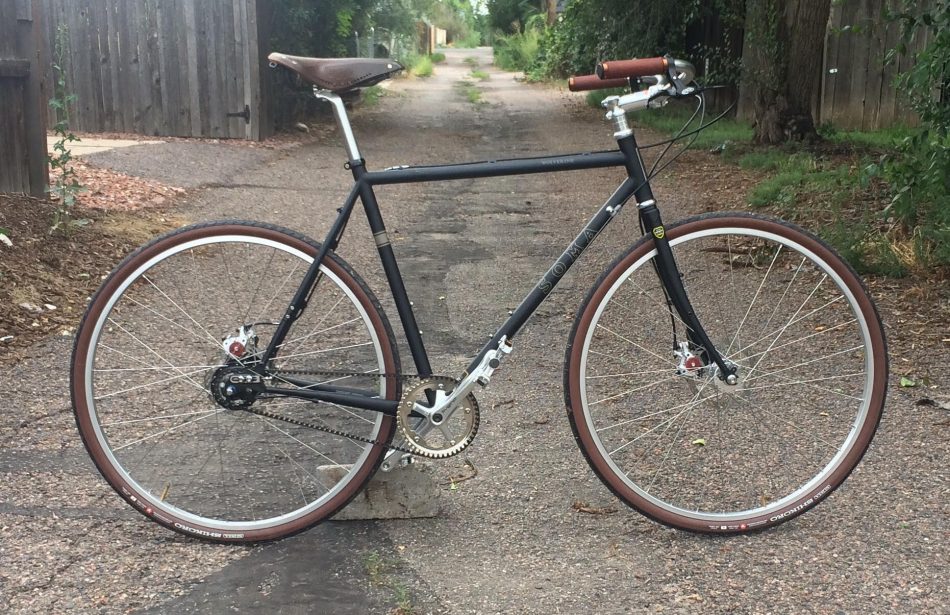
SOMA Wolverine

Working at Excel Sports had its advantages. One of them was the great people, and another is exposure to cool stuff. Well, I got pretty into some niche bike elements while working with some of the Japanese companies we dealt with regularly, so when I left Excel and started thinking about commuting to work I started thinking I may need to buy a new frame.

Gates makes bike parts as well. The Gates Carbon Drive is a belt drive system for bicycles and I figured it might be a good idea to get familiar. So I picked up a Soma Wolverine and started to pick up parts for it slowly. This bike kinda needed to be authentic. So, with the goal in mind to build it without any quick release elements (for theft) I started ordering parts. The Tange Prestige frame needed all Japanese parts, so Nitto Bars, stem and seatpost, Sugino crankset… Everything. Well, except for a few. Yes, I had to compromise on the front hub, I just couldn’t find the right bolt on front hub for disc brakes otherwise. The brakes are Avid and the saddle is Brooks. I’ll be honest, the saddle was pretty much a no question saddle. It was on another bike and I just love it… It also matches pretty darn well.

Building this bike posed a few challenges. First, I don’t work in the bike industry anymore and I have grown accustom to having all the parts I need when I discover I need them. This planning ahead thing is really difficult. The other thing that was challenging was learning the quirks of a belt drive system. Choosing the right parts to get the belt aligned properly was a little challenging and I did end up buying two BB’s while trying to sort it all out.

Finally, the bike came together, the belt alignment is still just a little off and I have some ideas to fix it. 1.7mm out of alignment but it seems to be riding well. I finally took the bike for a spin and put 8 miles on it. I learned I need to get a little longer stem and I learned that I have to get used to having so many gears! It rides very smooth and silent, the frame is stiff and fun to ride. I’m looking forward to some commuting here in the near future.

1968 Datsun 1600 Roadster

In 1969 my 23 year old Dad bought a new car, it was a Datsun 2000 Roadster. He wasn’t able to pick it up so my Grandmother drove it home after my Grandfather dropped her off at the dealership. The story goes that she got home and more than 20 minutes later my Grandfather got home asking what her rush was. She said she kept it at 40 the whole time.

She was right, she kept it at “40” but 40 in this case is 4000 RPM’s and in 5th gear, that was in the neighborhood of 80 mph. Those crazy little sports cars with their tach in the center threw her off!

This Datsun was his second roadster, his first was a 1600. He loved both of these cars, but had a real soft spot in his heart for the 2000 with its larger engine and 5th gear! If you talk cars with my Dad, he always comes back to the little Datsuns and he has a bunch of stories about his cars. Well, for a long time these stories rattled around in my head and around 2008 I stumbled upon a 2000 roadster in Alaska, in a shipping container… Untouched for around 30 years. I really thought I should buy it, but it was in Alaska and I was not, so the distance really added costs that I couldn’t justify. I figured one day I would get my hands on one though.

In 2014 I was in the midst of preparing my condo to sell and shopping for a house. I headed over to our local cars and coffee and there was a little Datsun 1600 Roadster for sale. Ugh, I don’t need this, and sheesh, this one has had some work done to it so who knows what is under all that extra paint… But it sure was tempting. The British roadster guy ended up with this little car “kinda by accident.” I chose the responsible route and passed on the little car.

In 2015 I was getting the itch again. Man, I really need to just pull the trigger if I am going to do this! Turns out my friend Rhett bought the car from Cars and Coffee and I asked him what he was doing with it. The price started coming down every time I talked to him and at some point, the car was in my shop…

Immediately I had to debate, do I tell my parents? Do I wait till I am done and then show them? Hmm.. I opted to tell my Mom and Sister and not tell my Dad. Lets surprise him.

I dug into the little car and yes, my suspicions were correct, it certainly had a lot of undesirable traits. Rust, more rust, some dents… and a little more rust.

I started working around the car replacing sheet metal and making new parts. This project was going to teach me how to make parts, not how to buy them. I bought an english wheel, a bead roller, a mallet and sandbag and some hammers and dolly’s. There’s a lot to learn.

Front Passenger footwell:

Rear Inner fender:

Trunk area:

Front Passenger Fender (in Process):

And there is much more. Over the last year I recieved a couple tools as gifts from my parents that were specifically intended to work on the car… though my Dad didn’t know. My mom even made a special trip out here to work on the car to surprise my Dad too!

I have been getting fairly close to finishing the metal work for the car. Depending on motivation that could be done in the next couple months. But there is still a lot to do. From interior restoration, engine tune up, replacing belts and hoses and more I have been making the list…

Now, if this is all such a big secret, why am I publishing it on my website? Well. Turns out this thing is taking longer than anticipated. I am having a tough time keeping my mouth shut when I call home and my parents are planning trips out here. So I thought to myself, maybe its surprise enough… and maybe I can recruit help. So I called up my Dad last night and told him all about the car. I would say that his reaction was “Speechless.” Then I asked if he wanted to have some part in the restoration? Maybe restore the seats? Maybe the radio and center console? He sounded pretty interested in his speechless state… so Center console is going in the mail for him to restore. I suspect that radio will work better than the day it was new!

Most of the paint and bondo and other fillers are off the car right now, I am looking forward to getting it on the road, but expect more updates as I continue to make progress.

If you want to follow along on the forum that I have been posting it all too take a look here: 311s.org

Breakin’ the Car…

At the end of last season I was out with a friend at CORE on a test and tune day and just as we were wrapping up our last lap… BOOM. Yes, I broke the car. Honestly though, it had it comin’. It was a simple break and if I had thought to brought parts, we could have driven it home. But I didn’t think to bring parts, so I got to use my AAA membership. They delivered the car to my driveway. Very convenient.

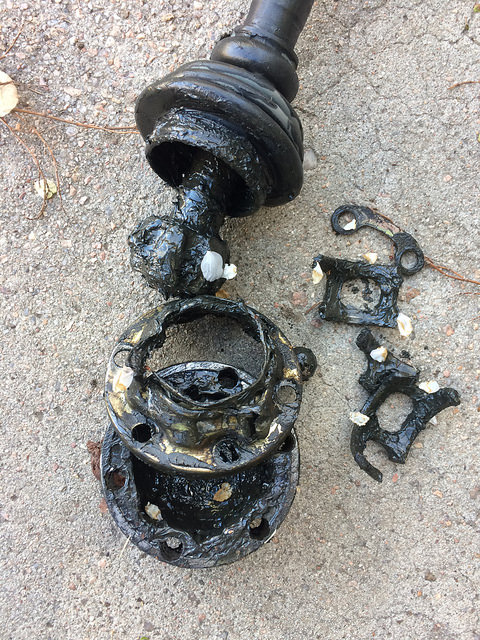
After months of pretending like nothing happened I finally fixed the car. Now, I knew I broke the axle, but I didn’t realize how bad I broke the axle!

A keen eye will tell you that those bearings machined the metal of the outter cup on this CV and when I tried to loosen the bolts I realized that they were captured! So a big hammer was needed to maneuver the metal back into position so I could get those bolts out. Once done that CV just fell apart!

I have broken two CV’s in this car now and I am looking into a suitable solution to this problem. I am thinking that these CV’s need a bit more flexibility to deal with the wide range of suspension travel that they are likely to see in this car. I think they are maybe even a touch long too for this application. I have to take this one on over to CVJ Axles to see what they suggest.

New Dining Table for me.

So I have these legs kicking around for a dining table. The legs were from a Room and Board table that I had. The top was originally glass, and I hate glass tables. I know, it is silly, but just seeing through the table to see everyone’s legs seems weird to me, so I don’t like it. In addition to my own personal issues with glass tables the glass was also chipped on this table. So I have thought about what I want to make to replace the top.

One day a friend name James Davis was coming up with some new ideas and I happened to have a truck and was willing to travel. James has been experimenting with Electricity, water and wood. It really sounds pretty much like a terrible idea when you list out the ingredients. But take a moment to google Lichtenberg figures and you will be pretty interested in the results!

The electricity burns channels into the wood. This is guided (sorta) by the water that is applied. Once done the channels can be as much as about 1/8″ deep and need to be filled in. James uses epoxy to fill in the channels. With some good sanding I was able to clean up the rest of this Walnut top and get it ready for finishing. The wipe on poly finish really brought out the wood color.

I’ll be honest with you, this is a tough project.. not because it was exceptionally difficult or took a long time. It was tough because of self control. While creating the Lichtenberg figures I just wanted to watch more and more, but somehow you have to control yourself otherwise you will end up with a table that has too many patterns on it! I think this table ended up, just asymmetric enough and with just enough figures to make it interesting without so much patterning that it would be too busy. If it were in my budget I would have loved to start with a large piece of wood, one slab rather than a butcher block top. Maybe next time.

Fall Photo Shoot

Alan bikes are an innovator in the world of cycling, though nobody remembers them. We worked with Alan to bring a custom red color frame into our shop. Once done we put our team on that bike. Fortunately our new kits showed up at nearly the same time as the colors started changing so it was time for an early morning photoshoot.

One of our team members Riley Sheehan was ready for the task of waking up far to early in the morning in order to get some photos of the new goodies. We headed out to Valmont park to spend an hour taking photos. We got a number of good shots, but this shot was my favorite.

I can’t wait to get out and get some more shots… if I can only make the time!

Massive Shipping Tables

Heavy duty steel tables? Yeah, I can do that. The company I work for has had a lot of custom projects, these are fun for me. I like getting out of the office for a day or two and just making something. This time we were hoping to create very heavy duty steel tables that could be easily maneuvered. These are for our shipping department and, to be honest, they will never see the weight that they could take, but that is ok, because these tables will accept any torture you throw at them.

Now, the rest of the building we have used a lot of 2″ square tube and the little projects have always come out looking nice, but for this one, I really wanted to use 3″ square, the heavy duty look and feel just seemed necessary. Building two of these tables was mostly a challenge for one reason, symmetry. They had to be, exactly the same height and exactly the same depth so they lined up perfectly in the shop. This is fine, but to be honest, I just don’t have the best work space to try and get perfection when it comes to level and square.

I picked up some Casters from Affiliated Caster here in Denver. They just always have everything you could possibly want. Full locking swivel casters with a tacky rubber wheel makes these tables grip the floor and never slip. If you decide you want to wrench on something, these are not moving.

My welds are looking pretty decent, I would never say that I am an instagram welder, you’ll likely never see me walking the cup on any of my welds, but hey, I can be proud of these and I know they aren’t coming apart!

The next trick was getting these from the shop to my work. At 8’6″ long by 3′ deep, this wasn’t fitting on my personal trailer. So I rented a Uhaul to deliver these. They are completely raw, no clear coat. The patina should protect them in the future. Once delivered Jody Proctor cut some Melamine tops for them (please trust me, I wanted to do anything but Melamine) and we installed them in their new home.

TigerMonkey Food Cart

When a friend says they are starting a food cart business you know you’re in for something interesting. Susi Kim is my childhood neighbor who just happened to also move to Colorado. She decided to start a Korean BBQ business because, well… If you tasted her food, you’d understand. She bought a cart and was looking for some help to modify it to her needs, but when we looked at all of her needs, they didn’t line up with the size of the cart she bought! So we started over.

The team included myself and Dave Lehl, both photographers and both all round crafty guys. Susi gave us pretty free reign on the design and we started with a 4×8 harbor freight trailer that we cut down to a more appropriate size.

The requirements for her cart were, functioning grill, functioning hot water sink, a cooler and a chilled toppings rack on the top of the cart. We toyed with different ideas for designs and came up with a center mount grill, multi rack Cooler, Sink and storage.

The chassis was designed with 1″ square tubing and all the sides were skinned with plastic using aluminum angle to finish the corners. The plan is to wrap the cart eventually, initially however budget says no.

With the entire cart built out, skinned and ready Susi drove it over to a sheet metal guy to have the top fitted. One sheet of Stainless steel with proper cuts and folds to fit our design. This piece fit nearly perfectly with only a few odds and ends to final fit to the grill and cart.

We used proper insulation and heat reflective elements to keep temperatures from the grill in control and we ducted proper ventilation for the grill using a sheet metal skin.

Overall the cart took us about a month to build, we typically worked on it maybe one day a weekend however so the number of hours was minimal. Susi has been all over denver since cooking up a storm!

What happens when you get your Citizenship?

After years of paperwork and the diligence of Cathey, Paul is a citizen of the USA. First, some back story:

Paul is from Australia, he is however known as “Canadian Paul.” There is a long story, originating in Mexico that starts this whole name off, but none the less, Canadian Paul= the Australian.

So when Canadian Paul from Australia got his US citizenship we determined a special treat was needed. Evan Chute put together the appropriate flag. We call it the USaustranadian flag:

Now I can’t leave well enough alone, so I was at the shop and thought: Hmm, how can I make this even more fun. So I built a wooden box to deliver both some flag decals and a metric tape measure. The wooden box seemed a bit to bland. As I was starting to rethink the box I realized, it just didn’t look like a present. How in the world can I make it look more like a present? Well, I think a Bow is needed… I dug around in the scrap and determine, it was going to be a Steel Bow.

Twisting up some steel and tacking a bolt on the back of it, I was able to bolt the bow onto the box lid for a nice original gift. Needless to say I put a pile of screws in the lid so Paul had to remove the lid with tools.

Server Cabinet

For a long time I have looked at a row of server boxes, sitting on a table, in the kitchen of my work. They were exposed to people, they were exposed to potential accidents. When we were remodeling our kitchen one of the owners said: I want one of those sprayers so we can wash our dishes. So I made reference to where that sprayer might be pointed if for some reason something bad happened. he turned around and saw the row of servers. Now we had two projects on our hands. Finish the kitchen… and design a server rack!

Server racks are readily available, if you have rack mounted servers! Unfortunately we had all individual towers and this posed a challenge. We needed to be able to house at least 7 servers plus battery backups and some other odds and ends! All of this needed to stay cool but protected. So I spent a little time in Sketchup and was able to put together a plan. Once I acquired materials I set to work putting this thing together. Most of these projects take nearly as much time cutting as they do building. So after quite a bit of time on the band saw I was left with this pile of steel.

Assembly of the chassis of this server rack was pretty simple, keep everything square and get it all tacked up. Once I got all the welds on it I started assembling my secret ingredients. I used a sheet of perforated steel and used my bead roller to put some details in the sides. These details not only make the steel stiff, but they also just give it a little more of that quality custom look.

This thing is big. I mean really big, it is certainly able to fit in our building with no issues, but in order to accomodate these servers it is tall and heavy. With a sheet metal top to protect in case of a roof leak in the building, perforated steel sides and heavy duty casters it was no joke getting this into a uhaul to get it moved up to its final resting place.

Finally, once installed I picked up a piece of smoked acrylic sheet and fit it as a door for the front. This gives it some protection where the perforated steel sides, shelves and open back give it great cooling.

This thing is heavy duty and solidly protects all of our servers. Next step. Rewire the whole building.

10/15/2016 update: I finally got around to rewiring the server rack, all wires in and out of our DSL and Cable modem (redundant systems and backups) The word on the street is 15% increase in speed. I discovered a few pretty incredibly old wires as well which really made me think that we dodged a bullet. If one of those wires failed I am certain we would have had massive problems and who knows how long it would have taken to figure it out. The system is entirely on Cat6 cabling now which replaced all cat 5 cabling.